Welcome back to Hen Corner!
Our last post was all about milk and this one is about honey… We’ve had an exciting time recently which has welcomed new chicks, been packed with preserving and celebrated our first full honey harvest!
By subscribing (box right) you’ll never miss a thing!
 Don’t count your chickens..
I must admit that I was a bit sad that only two of the six eggs under Butternut hatched successfully but they are wonderful breeds; a Black Orpington (who will grow up to be as big as Butternut) and a Crested Polish (who will look like a Dr Seuss character). If these are both girls, then I’ll be thrilled as we can keep them and integrate them into the rest of the flock of egg laying girls. Maybe next year, I’ll stick a whole dozen eggs under her as she’s big enough to sit on them all!
 To Bee or not to Bee…
Last post I said that I would tell you about my big mistake with the bees, and I don’t want to take away from the celebration of our honey harvest, but we would have collected more if I hadn’t messed up last month. It goes back to the swarm in July when I was very pleased with myself for collecting the queen and her entourage from the apple tree. Unfortunately, in an attempt to prevent another swarm, I went through the original hive removing all the queen cells (where new queens are reared). In hindsight, I discovered that I killed the new queen before she had emerged from her cell… this meant that the original colony was now queenless, could not reproduce and needed to be combined with the new busy colony. I followed instructions to mer ge the colonies but made the mistake of putting clearer boards (one way valves) between the hives so that once the old bees had transitioned into the new hive they couldn’t get back into the old hive. This process is usually used to remove bees from the supers (boxes where the extra honey is stored) but my idea failed miserably as the holes in the valves were two small for the drones, boy bees, and they caused a pile up at the exit resulting in loads of dead bees and no way out. When I tried to sort out the problem ‘World War Bee’ broke out as the two colonies turned on each other… So I lost thousands of bees in a matter of hours as both victims and perpetrators dropped to the ground. Since then, the new and now weaker colony have been feeding from the honey that the others had made. I think we lost about 20% back to them, but after my mistakes I need to prioritize them building up strength and stores for winter. As Emma Tenant says in her recent blog post ‘Beekeeping is not all about the honey – it is about keeping bees and making sure that the season ends with a strong and healthy colony.’
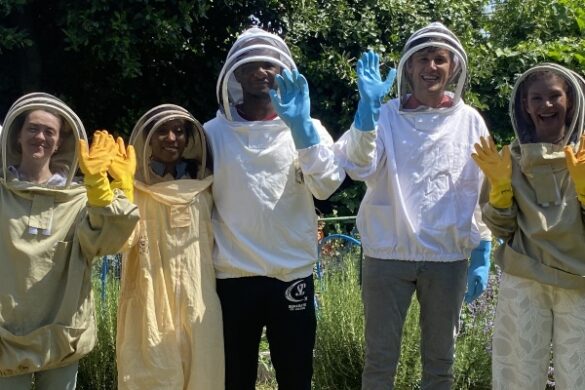
 Show me the honey!
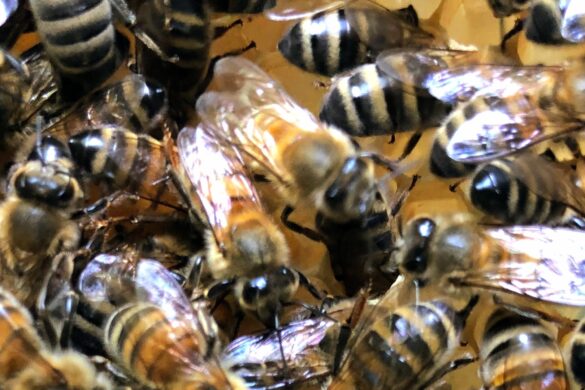
Fortunately, we were able to take quite a lot of honey from the bees this month. This is an annual task which needs a bit of planning; clearer boards need to be put in place to separate the bees from their beloved honey, an extractor needs to be borrowed (thanks Thomas!), new jars need to be bought and sterilised – it’s a bit like getting ready for a new baby! Then the room needs to be prepared; furniture moved for space, floors and surfaces cleaned and, finally, all the doors and windows shut to keep stray bees from discovering our plan. Richard, my brother-in-law, who blogs here, came to take some of these photos and the proceedings began. The new Beehaus hive from Omlet is predominately made of plastic and this makes the supers, easy to handle and lighter than traditional large wooden boxes, fortunately, I had used the clearer boards properly this time and all bees were out, so we could begin the process of uncapping.  Using a special fork, and working over a large roasting tin, we lifted off the fine wax cappings that hold the honey in the hexagonal wax cells. This exposes the honey ready to be spun out of the frames by centrifugal force using a hand turned extractor. This is a large plastic cylinder with a cage inside that hold four frames of honey at a time. By turning the handle on the top, the cage rotates and the honey flies out of the cells to the internal walls of the cylinder.
 Drip, drip, pour…
The honey then collects in the base ready to be poured out through the tap at the bottom into a settling vessel via a fine sieve. The whole procedure, which took two hours, went like a dream and I think we only got a couple of drips on the table top. Once filtered, Rich, Andy and I cracked open a fine bottle of last year’s vintage cider in celebration of the 30 jars worth that we had collected from our busy little bees, amazing when you think that one bee only produces a teaspoon of honey in its entire life.
After getting it into those jars, all we need to do is label it up for sale…
Cheers to the bees and may I care for you even better in 2013!
Book of the Blog Post:
 Collins Beekeeper’s Bible: Bees, honey, recipes and other home uses
This week it as we’ve celebrated a beekeeping first, we are featuring a beautiful book that my parents bought me in the earlier stages of Plan Bee it contains…
This book is available with many of our other favourites books from the Hen Corner Shop!
Other News:
- We’re thinking about writing our own book… so watch this space and ‘Like’ us on Facebook if you think it’s a good idea
- Preserving season has begun with chutney, pesto and piccalilli… We’ve made 22kg in the last week alone!
- Cider Sunday came around again, we made 32 pints, not bad considering that apple harvests have been poor across the UK this year, and Country Living magazine gave us this lovely write up.
Jobs for next week:
- Get out our pinnies and pans for the Pick and Pickle Day
- Plan the Chickens Workshop for Ealing Re-Skilling Day
- Clear out spent veg plants from the Kitchen Garden
![]()
Have a good week yourself…
Join us on the Journey!

Discover more from Hen Corner
Subscribe to get the latest posts sent to your email.